Oh, those pesky carpenter bees......
Let's look at the who, what, why and how of these wood-damaging little critters. Introducing: genus Xylocopa, the carpenter bee.
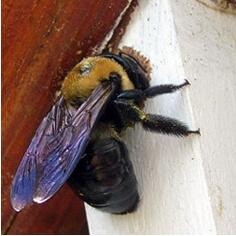
Carpenter bees resemble bumblebees. The two species are close in size and appearance. The main physical difference is that carpenter bees have shiny abdomens while bumblebees are hairy. Carpenter bees build their nests in wood framed buildings or trees. If you're seeing bees hovering around the eaves of your house or outbuilding, and small holes in the wood, then you know you have carpenter bees.
Generally it's the male bee you'll notice. He hovers near the nest and darts after any flying insects that come too close. If you wave your hand in the air or move quickly the male bee is likely to approach you as well. The good news is that the male carpenter bee cannot sting. The female carpenter can sting, but rarely does. She must be provoked or handled before she'll react with a sting.
That takes care of who they are. Now let's look at what they're doing, why and how you can protect your wood.
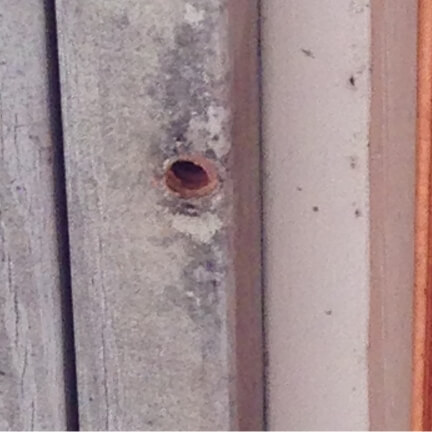
Carpenter bees are not actually eating your wood. They chew and discard it to create tunnels for shelter. While they prefer softer woods, carpenter bees can be found in almost any wood available to them. They hatch and raise their young in the chambers they have excavated. They start by drilling an almost perfectly round circle into the wood, about 1/2 inch in diameter.
Once the tunnel is about 1 inch deep the bee turns to tunnel with the grain of the wood. Carpenter bees prefer to drill in wood that is thicker than 2 inches. They also prefer untreated and unpainted softwoods, such as pine, cypress, cedar and redwood, but will happily drill into almost any wood you have provided them with!
The male and female bees hibernate in the tunnels in winter. Carpenter bees mate in spring and start cleaning and enlarging their tunnels to create brood chambers, their nurseries. Each chamber is stocked with "bee bread," a mixture of pollen and regurgitated nectar. This serves as food for the larvae. Once an egg is deposited on the food supply the chamber is sealed off. The female usually creates six to eight chambers. The larvae hatch from their eggs and develop in the chamber, emerging in August. They then feed on nectar and return to the tunnels for winter.
Since each year's broods return to the place they were born, the tunnels multiply, become branched and can cause considerable damage. Moisture can enter the tunnels and cause rotting. Woodpeckers are also attracted by the carpenter bees and can cause further damage.
So how? "How can I get rid of them," you ask. Unfortunately there is no quick and easy solution. No magic spray or fairy dust will solve this problem for you. Ridding your wood of carpenter bees will take some time, planning and vigilance on your part.
The first step is identifying and noting where carpenter bees have created holes in your wood. Check your eaves, facia boards, siding, window trim, decks and outdoor wooden furniture. Unpainted, bare or weathered wood are the most likely spots to have provided homes for the bees. Look for fresh sawdust around the hole and stains on the ground underneath them.
Apply an insecticidal dust directly into each hole. Using a duster that will puff the dust up into the tunnel and coat the sides is the best way to accomplish this. Check with your local cooperative extension service, pest control or home improvement store for recommendations on an insecticidal to use. The best time to treat the area is at night while the bees are resting. You can tape red cellophane over a flashlight to allow you to see without agitating the bees. Wear a dust mask and follow all of the recommended safety precautions provided with the insecticide. The bees will pick up the dust as they travel through the tunnel opening and carry it into the tunnels with them.
You should repeat this process several times. First in spring, when you start to see carpenter bees, and again in mid-summer. Last, in early fall treat again to reach bees planning to spend the winter in the tunnels.
Your last step is to plug the holes. You can cut a wooden dowel into short pieces and glue them in place, or use wood putty. An alternative is plugging the hole with aluminum foil and caulk. This is an important step to eliminate the future use of the tunnels for over-wintering or nesting.
What if I don't want to use any chemicals or pesticides?
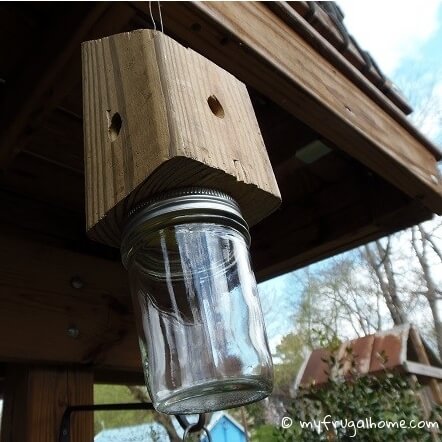
One other DIY solution to a carpenter bee problem is an option, although it's not a permanent solution. Carpenter bee traps do work to some extent and have the advantage of being completely safe and environmentally friendly.
The plans for this trap shown can be found at My Frugal Home's website.
Finally, vigilance is required. If you have wood you can't completely prevent or eliminate carpenter bees. Checking your home or building on a regular basis to find and deal with carpenter bees before they cause major damage should part of your regular maintenance routine.